Tuesday, December 18, 2012

of French Mustard and Beef Stew

Probably the best thing about fall, besides the gorgeous kaleidoscope of colors here in DC is the change in temperature. Gone are the Amazonian summers in America's Swamp as the city takes on a fresh new season. Brisk mornings and chilly evenings replace the sweltering heat and crushing humidity. It finally feels like you can breathe again. Fall in DC is something to be experienced. The oranges, reds, yellows, and purples which dot the city streets and the national mall give the whole place a different feel. I love my morning runs when leaves crush under my feet as I head toward the Tidal Basin as well as the need to wear a coat out when I hit the town at night. And so in honor of fall and in deference to the fabulous weather I felt like making a homey and soul satisfying dish.

I originally tested this recipe on my roommates during our time off for Hurricane Sandy. We were extremely lucky in that we had power throughout the frankenstorm and other then a few downed trees, very little damage in our neighborhood. The local Safeway was out of many of the ingredients I needed to make the dish I originally intended to make but they had everything I wanted for the stew minus mushrooms; luckily Trader Joes had them today. The dish takes a bit of time, and I'm sure it could possibly be done in the crock, but I feel like there is nothing better than stove simmered stew. The way the flavors meld but don't break is at once fascinating and rather inspiring. Additionally the fond (what those little bits that stick to the bottom of a pan are called) created through the browning process pack a flavor punch that continues to blow me away once the pan has been properly deglazed. Don't be intimidated by the process, I have a very simple method and the stew is absolutely worth it!

Today's Cast of Characters:

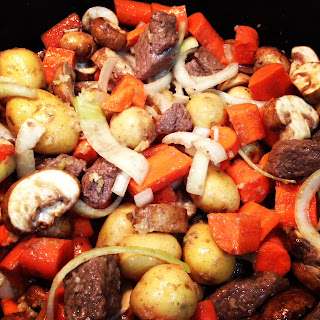
The most important thing to remember with stew is that you can get a cheaper cut of beef and it will probably turn out more delicious. In that respect I got a huge chunk of Bottom Round and butchered it up quite nicely with a sharp knife into bite size pieces the first time I cooked this. Today I used prepackaged stew meat from Trader Joe's. Carrots, onion, and mushrooms are also musts with this recipe to create that hearty, earthy, rich taste I've come to associate with the dish. My favorite part of the stew is the potatoes. Today I used itty bitty potatoes but you can also use smaller ones cut in half or larger ones cut into six or eight pieces. To create the base of the stew a few ounces of beef stock (don't use broth, trust me on this), some grey poupon or other type of dijon mustard, and a little bit of tomato paste combine with a host of spices and the fond created by the flour mix you dip the beef pieces into. Some olive oil for browning up the beef, a bay leaf, and some fresh basil to finish off the dish complete the well rounded list of ingredients.

What to Do:

First In large bag combine flour, herbs de Provence , 1 teaspoon pepper, and 1/2 teaspoon salt. Add beef and shake to coat. Get your oil going on medium high in the meantime. Today I used a 5.5 qt dutch oven but you can use any big pot you may have lying around. I like the way the cast iron browns meat the best so thats what I try to use.

Chop up your veggies and put them all in a bowl. They all get added at the same time so its convenient. I like to have hearter portions of veggies in stew so I just give the carrots a rough chop, make thick half moons with the onion and cut the mushrooms into a few pieces. Today the potatoes just needed a quick wash but if I use bigger potatoes I chop them in half.

Now its time to brown the beef. Reserve the excess flour but remove your coated beef from the bag and throw it in the pot. Don't be scared by the flour getting stuck and making a brown mess in the bottom of your pan. That's the fond I was talking about before and that is where the flavor magic happens.

Once the beef is browned, stir in onions, carrots, mushrooms, and potatoes. Cook and stir for about three minutes then stir in tomato paste, mustard, and remaining flour mixture. Things should start smelling heavenly.

Next add the beef stock a little at a time while stirring the mix and scraping the bottom of the pan. The fond should come right off after a few ominous sizzles and you stock will taste all the better for it. Once all the beef stock is in add the bay leaf.

Bring your mix up to boiling and then reduce the heat to low. Cover and simmer one and a half hours until beef is almost tender. Snip in some basil and cook another 30 minutes. The beef is basically done before the basil goes in but I just love making it even more tender.

Before eating, remove and discard bay leaf. I generally serve this up in bowls with a bit of crusty bread for sopping up all the deliciousness. Enjoy!


French Mustard and Beef Stew

Ingredients:

1/3 cup all-purpose flour
1 tbsp Herbs de Provence
1 tbsp snipped fresh basil
1/2 tsp salt
1/4 tsp pepper
1 ½ to 2 pounds boneless beef chuck, cut in approximately 1 inch pieces
2 tablespoons olive oil
1 or 2 medium onions peeled and cut in wedges
5 or 6 carrots
1 8 ounce package cremini mushrooms
1 package itty bitty potatoes or 8-10 small red potatoes halved
3 tablespoons tomato paste
2 tablespoons Dijon Mustard
1 32 ounce package beef stock
1 bay leaf


Directions:

1. In large bag combine flour, herbs de Provence , thyme, 1 teaspoon pepper, and 1/2 teaspoon salt. Add beef and shake to coat. Get your oil going on medium high in the meantime.
2. Chop up your veggies and put them all in a bowl. I just give the carrots a rough chop, make thick half moons with the onion and cut the mushrooms into a few pieces.
3. Reserve the excess flour but remove your coated beef from the bag and throw it in the pot and stir occasionally until brown.
4. Once the beef is browned, stir in onions, carrots, mushrooms, and potatoes. Cook and stir for about three minutes then stir in tomato paste, mustard, and remaining flour mixture.
5. Next add the beef stock a little at a time while stirring the mix and scraping the bottom of the pan. The fond should come right off after a few ominous sizzles and you stock will taste all the better for it. Once all the beef stock is in add the bay leaf.
6. Bring your mix up to boiling and then reduce the heat to low. Cover and simmer one and a half hours until beef is almost tender. Snip in some basil and cook another 30 minutes. The beef is basically done before the basil goes in but I just love making it even more tender.
7. Before eating, remove and discard bay leaf. I generally serve this up in bowls with a bit of crusty bread for sopping up all the deliciousness. Enjoy!

Thursday, November 29, 2012

of Glitzy Christmas Wreaths

I just love holiday craft projects. Really, I love any craft in general that deals with plants. The best part about crafting around the holidays is that you can share your spoils with everyone you care about in life. Also be proud of me for posting more than one thing this month! I'm improving. My oldest sister Mandy, whom you may remember recently had a birthday, came up with the idea to make these wreaths for our parents (pictured above), aunt and uncle, and nana and papa after seeing this post. Mandy is a fabulous idea woman but becomes easily overwhelmed with creative projects and so I am often tasked with following (straying from) the directions. We make a fabulous if a little distracted team.

I love having guidelines for creativity occasionally, especially when I have not done a certain project before but I generally try to make each project my own. The wreath in the above post is beautiful, but being a plant and foliage kind of gal I felt I could make a few tweaks to create a wreath more to my liking. The result was so fabulous that I ended up making them for my sisters as well (Katie's is the star of this post), and at only about 12 dollars a pop the wreaths are way cheaper than something you could find in a store. I bet you'll like the finished result better. Plus since you are using all fake stuff you can use this decoration for many years to come. I think it would be fun for older children as well, although I did burn myself on the hot glue many a time.

Todays Cast of Characters:

Christmas glitz abounds today with fun things from Michael's and the Dollar Store. I made three wreaths each go round so I got two sizes of ornaments from the dollar store but you will only need about 8 small and 5 larger ornaments total. It would be nice to use some existing ones if you have those lying around. I also found delightful little sprigs of evergreen with berries. I thought they were exceptionally cute but they only came in a two pack so one lucky family member got two sprigs on their wreath. From Michaels I got a grape wreath (its the brown viney looking one), their plant garland, a few little flowers, and a cute little bird that had a pine cone and sprig attached. As for the garland, I definitely prefered the one I used on my parents to the one I used on my sisters. It was easier to work with, lusher, and much more sparkly. Luckily my mom has a hot glue gun and tons of glue as well as several nice plaid ribbons available at her house so I didn't have to purchase anything. Since ribbon was on sale, I'd imagine it would only add a few cents to a dollar to each wreath price.

What to Do:

To start out, remove the pieces of garland from the chain link they are attached to. I used one third of the garland for each wreath I made which I imagine is roughly 2 feet. You don't have to cut each individual piece if you don't want to but I think it gives you more material to work with in the end. Don't snip too close to the end of the plant, it will cause issues.

Continue snipping until just the chain link is left. Next, place your eye catchers (which in this case are the bird and the sprig of berries) where you think they look nice on the wreath. I like the bird to be perched higher up on the wreath but really it will look good anywhere. The trick is creating a good balance of color and texture on the wreath.

I like to put the little flowers right near the bird or other focal point so I hot glued a few of them at first and then worked my way up to a bunch.

Next fill in between the two focal points. I like to create a layered look so I glue some big pieces of the snipped garland down first and kind of layer up between them. Be sure to leave some room to glue in the ornaments. This was a particularly tricky garland because of the abundance of red berries.

Roughly estimate the size and position of your bow and make sure you have enough garland to fill your wreath until that position.  It doesn't have to be exactly in the center if you would prefer it elsewhere.Then work on filling in the greenery and making it look cheery. This is where I burned myself most with the hot glue so please be careful!

At this point my mom started making the bow. I have no clue how to make it but she watched this tutorial on youtube and had fabulous things to say about it.

Once that fun is done its time to place and glue your ornaments. This takes a lot of hot glue but the end result is worth it. I put them where I find a bit of room and also where I think they look good. It is important to have a mix of sizes and styles in one area. I also like to highlight certain features of the wreath by putting the glitzier ones there.

Finally attach your excellently crafted bow to the section you left for it and take a step back to make sure everything looks kosher. I found that on most of the wreaths I had a little bit of the snipped garland left that I would stick in a place that didn't look as lush.

Your wreath is now ready to share! It can be placed indoors or outdoors but it will obviously last longer when kept inside or at least protected. Enjoy!

Monday, November 12, 2012

of Fancy Chicken and Creamy Rice Casserole

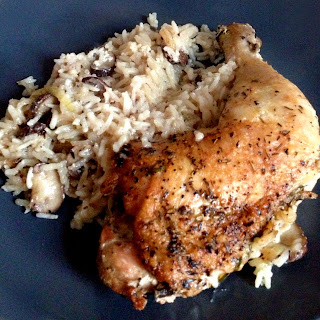
In honor of my sister Mandy's birthday I decided to share a delicious dish I tend to make for special events. One thing I used to be horribly afraid of food wise is rice. When I was a little girl, the absolute only way I would eat rice was in my mom's (but possibly grandmother's recipe) chicken and rice casserole. The way the juices would mix with the French onion soup mix and rice was complex, creamy, salty and absolutely delectable. I couldn't resist that flavor profile. I've grown up a bit since then and have even come to semi even like rice; provided there is some sort of flavor attached. This recipe is by far my favorite way to eat it, heck I've even made the rice recipe without the chicken.

I make fancy chicken and rice casserole in the wintertime when I'm looking for a more stick to your ribs kind of dinner, for friends birthdays, or even for impressing some dinner party guests.  This recipe is a relatively versatile and easy to make stunner that will knock your flavor socks off. The creamy herbed rice creates a kind of French risotto vibe that melds perfectly with the flavorful and juicy chicken. It is at once comforting, interesting, and a nice change for those who usually don't do French because of sauces that are too rich or recipes that are too involved. BTW the fresh herbs make all the difference so try to use those if you can!

Today's Cast of Characters:

Kind of involved ingredients wise today which I enjoy immensely, I always like to give myself ingredient challenges every now and again. We have chicken, rice, chicken broth and fat free half and half of course (you could sub in some cream for a dreamier treat); but we also have a little bit of sour cream and dry white wine hiding out in the sauce. Salt and pepper lend some taste to both the sauce and chicken while Herbs de Provence or Italian seasoning  provide a little something for the chicken to love.  We also have fresh herbs; I usually get the poultry mix at the grocery store because I am not special/talented/responsible enough to grow them all in my house. I always have fresh basil on hand though due to my trusty basil plant Milton, the one who tries to take over my life. Things continue to get interesting with Cremini mushrooms, paprika, garlic, onion, and olive oil. All of these ingredients work to give this casserole such an incredible depth of flavor that the whole dish should make mouths very happy indeed.

What to Do:

First, as always recommended when using the oven, preheat the oven to 375°F. This dish takes awhile to bake and you won't want to wait around as soon as you smell how good this baby smells.

Next, heat 2 Tbsp of olive oil in a large sauté pan on medium high or high heat. The pan should be hot enough to brown but not burn. If it helps, I usually use medium high because I'm horribly afraid of burning anything.

Season the chicken pieces all over with salt and pepper and Herbs de Provence or Italian seasoning. I use Herbs de Provence usually but sometimes I mix it up.

Working in batches, brown the chicken pieces on two sides. Since you are not cooking it through it will only take about 1-2 minutes per side per batch. Add a little olive oil if needed after every batch. This will help prevent the chicken from sticking to the pan but if you are cooking it right, the chicken will not be sticking. Remove chicken pieces and set aside in a bowl with paper towels.

In the same sauté pan lower the heat to medium, add the onions and a bit of oil and cook until translucent. This generally takes about 3 minutes on my stove. Add the garlic and cook until fragrant and just starting to brown. Remove onions and garlic to a 9x13 casserole dish.

Raise heat to medium high, add the sliced mushrooms. Do not add any butter or olive oil to the pan and dry sauté them, allowing the mushrooms to brown lightly and release some of their moisture. Add the mushrooms to the casserole dish.

Add the dry white wine to the pan to deglaze the pan, scraping off the browned bits from the bottom of the pan. Let the wine reduce to about 1 Tbsp which can easily be eyeballed since the mix will reduce by 3/4.

Then add the chicken stock, and remove from heat. Stir in some salt, a bit of pepper, the fat free half and half, and the sour cream. Whisk or beat with a fork until the sour cream is evenly dispersed.

Add the uncooked rice to the casserole dish. Mix the rice with the veggies. Then add a little extra Italian seasoning or Herbs de Provence to the casserole dish if you want. I generally don't add any more seasoning because I prefer to let the fresh herbs shine however I was unable to find the fresh herbs today so I added a bit more Herbs de Provence and a good amount of fresh basil.

Chop up about half of each of the herbs included in the poultry mix. I usually do this by snipping them into the rice mixture but today was an epic failure in the fresh herbs department so I just did the basil. I then pour the stock, white wine, cream, sour cream mixture over the rice. Stir the rice, onion, mushroom, herb mixture so that everything is evenly distributed in the casserole dish.

Place the chicken pieces on top of the rice mixture in a single layer if you can, don't worry they will be crowded and sprinkle a bit of paprika on the top. Bake in a 375°F oven for 45 minutes if the casserole is still too liquidy, let it cook a few minutes more, still uncovered, until the excess liquid has evaporated away and the chicken reaches an ok temperature to eat. I often find that this takes about 50 to 55 minutes instead.

Finally, remove from the oven, serve it up on a plate and you got yourself one nice meal. Enjoy!


 Ingredients:

Fancy Chicken and Creamy Rice Casserole
 2 1/2 lb bone in chicken legs and thighs connected (6 per pack)
Salt and pepper to taste
2 tablespoons olive oil
1 medium onion, chopped
2 cloves garlic, minced
½ lb cremini or button mushrooms, sliced
1/4 cup dry white wine
1 ¾ cups* chicken stock**
3 or 4 tablespoons sour cream
1/4 cup fat free half and half or cream
1 cup raw, medium or long grain, white rice
1 ½ teaspoon salt
½ teaspoon paprika
about 1 teaspoon of Herbs de Provence
1 tablespoon chopped fresh basil
About 2 teaspoons each of fresh sage, fresh rosemary, fresh thyme

Directions:

1. Preheat oven to 375°F. Heat 2 Tbsp of olive oil in a large sauté pan on medium high or high heat (hot enough to brown but not burn). While you wait, season the chicken pieces all over with salt and pepper and Herbs de Provence seasoning.
2.Working in batches, brown the chicken pieces on two sides, about 1-2 minutes per batch. Add a little olive oil if needed after every batch if needed, if the chicken is cooking correctly, this will not be necessary. Please note that the chicken does not have to be cooked through, only browned. Remove chicken pieces and set aside in a bowl with paper towels.
3. In the same sauté pan lower the heat to medium add the onions and cook until translucent, about 3 minutes. Add the garlic, cook 30 seconds more. Remove onions and garlic to a shallow (9 x 13 x 2) casserole dish.
4. Raise heat to medium high, add the sliced mushrooms. Dry sauté them with no additional butter or oil, allowing the mushrooms to brown lightly, and release some of their moisture. Add the mushrooms to the casserole dish.
5. Add the dry white wine to the pan to deglaze the pan, scraping off the browned bits from the bottom of the pan, since I use nonstick there are never any bits. Let the wine reduce to about 1 Tbsp, then add the chicken stock, and remove from heat.
6. Stir in 1 1/2 teaspoon salt, the cream, and the sour cream and mix until well blended and smooth looking.
7. Add the raw rice to the casserole dish. Then pour the cream mixture over the rice. Add all of the fresh herbs. Stir the rice, onion, mushroom, herb mixture so that they are evenly distributed in the casserole dish.
8. Place the chicken pieces on top of the rice mixture in a single layer if you can, don't panic they will be crowded. Bake in a 375°F oven for 45 minutes uncovered. If the casserole is still too liquidy, let it cook a few minutes more until the excess liquid has evaporated away, this dish usually takes about 50 minutes in my oven. The chicken should be a safe 165 degrees by then.
9. Enjoy!

Tuesday, October 2, 2012

of Slow Cooker BBQ Beef Brisket

This recipe is simply a must do during the hot sticky months of July and August here in DC. I originally created this recipe when our annual July 4th party took a turn for the crowded and my roommate Sharon and I were trying to decide what could feed the multitudes and not make our kitchen (the only common room in the house) unbearably hot. Sharon thought a hunk of meat in the slow cooker would be an excellent plan and I remembered the absolutely outstanding BBQ beef brisket my sister Jenny's sister in law Robin makes in the oven. Her recipe is a savory combination of all sorts of goodness and I honestly intended to follow it to a T. Unfortunately life had other plans and the morning of the party, with the window of slow cooking time closing rapidly, I discovered we had several shortages in our ingredients. Poor planning on my part but it created this recipe and I could not be happier with its savory smoky flavor.

Recipes can sometimes be challenging to me because they don't let me flex my culinary creativity but with recipes that I love I try to follow the rules. At least with this the amount of ingredients spice-wise is roughly the same as Robin's original recipe. The original is absolutely divine but I think that this method of preparation just makes this recipe more accessible to everyone. All of my roommates and I were busy with last minute rooftop and home preparations for our party and fireworks watching so none of us had time to sit around and twiddle our thumbs. This recipe is perfect for anyone who is busy but still wants to eat a hearty delicious meal. I plan on making this one year round and I don't think I will ever be disappointed in it!

Today's Cast of Characters:


Basically just beef and a whole lot of spices today. Make sure you buy a lean cut of the beef brisket because I'm not sure the juice would taste as good with the fat grease floating around. I usually cut off all the additional fat on the cut. Beef stock joins in the party to keep things interesting. Chili powder, smoked paprika, and cayenne pepper create a spicy smoky blend. They meld with salt, garlic, onion powder, pepper, sugar, dry mustard, and a bay leaf to create a perfectly seasoned, spicy, and layered BBQ beef brisket.

What to Do:

First make a dry rub by combining the chili powder, smoked paprika, cayenne pepper, salt, garlic, onion powder, pepper, sugar, mustard and bay leaf. If you remove the stem and crush the leaves bay leaves are edible. Things should be evenly mixed at the end.

Rub the mix on all sides of the brisket. There should be plenty of the spice mixture to cover the meat. If there isn't you can just mix a little cayenne and smoked paprika together to fill in the holes. I discard the spice rub that doesn't stick to the meat but I am always sure to leave just a bit of extra patted onto the top.

Add the beef stock to your slow cooker and gently place in the brisket. I find that 4 pounds of brisket isn't going to fit in my slow cooker pretty often so I end up cutting it and trying to rearrange a bit. It doesn't really matter as long as there are parts of every piece submerged in the beef stock.

At this point its a choose your own adventure! You could either cook the brisket on High for 2 hours and low for 5 and a half or just let the crock work its magic on low for 8 to 10 hours. I think it could be a great dish to come home to after a long day of work...I will have to try it this winter...

When the beef is fork tender its time to roll up your sleeves and provide a little elbow grease. In reality this brisket shreds like a dream but I like to imagine myself working harder. I shred by cutting with the grain and down and then using a fork to further break the brisket up if necessary.

When you have completed your task, switch the crock on to the warm or keep warm setting and return the beef to the stock mixture. Stir and serve it up. This was a huge hit at our party so make sure there is enough to share with everyone! We luckily had left overs so I can attest to the fact that it is delish the next day as well.

Today I served it up over some whole wheat rolls but don't limit yourself if you don't want to. This mix would taste just fabulous over rice or served as strictly beef with a side of mac and cheese. I am also planning to make nachos with some of the remnants. The point is enjoy!


Slow Cooker BBQ Beef Brisket

Ingredients:

1 tbsp Chili Powder
1 tbsp Smoked Paprika
1 tbsp Cayenne Pepper
2 tbsp Salt
3 cloves Garlic, mashed into salt or 1 tbsp Garlic Powder
1 tbsp Onion Powder
1 tbsp Pepper
1 tbsp Sugar
2 tsp Dry Mustard
1 Bay Leaf – crushed, stem removed
4 lb lean Beef Brisket
1 1/2 cups Beef Stock

Directions:

1.Make dry rub by combining Chili Powder, Smoked Paprika, Cayenne Pepper, Salt, Garlic, Onion Powder, Pepper, Sugar, Mustard, and Bay Leaf
2. Rub the mix on the brisket season meat on both sides, make sure you cover most of the beef with the mix
3. Add beef stock to slow cooker and gently place in the brisket. If there is not enough room just cut the brisket and try to rearrange.
4. Cook on High for 2 hours and low for 5 and a half hours or just keep the crock on low for 8 or 9 hours.
5. When the beef is fork tender, carefully remove from the slow cooker and shred the beef.
6. Return the shredded beef to the juices in the slow cooker and keep on warm until ready to serve.
7. Enjoy!

Thursday, September 13, 2012

of Sautéed Brussels Sprouts with Goat Cheese

As anyone who knows me is well aware, I have a strange fascination (bordering on obsession) with Brussels sprouts. I cannot say when it first started but I hope it doesn't end anytime soon. Many a friend and/or relative casts a supercilious eye on my culinary experiments with this strange and wonderful vegetable. They were originally cultivated by the ancient Etruscan people who lived in Italy and were seriously into and masters of gardening. Basically, a Brussels sprout is a genetically engineered cabbage; though it was done through natural means: kind of like how poodles became toy poodles. Science/History lesson aside I am always very excited to try any type of Brussels sprout. They are likely to taste gross when overcooked but during the golden peak of doneness before the cells break down they are a heady reminder of why I became so enthralled in the first place.

I absolutely hate boiled Brussels sprouts and for quite some time this was the only way they were known to me. They are mushy, gross, and they lose much of their nutritional value to the stupid boiling process. Luckily my mom tried a recipe of a friends and that, if I could pinpoint it, was the start of my love affair with this almost mystical veggie. These days I prefer my Brussels sprouts sautéed but I also sometimes enjoy them roasted. Their unique flavor and phenotype can sometimes scare off the uninitiated but no one who has tried these particular Brussels sprouts went away unconverted. Trust me when I tell you that the flavors in this dish will make your tastebuds stand up and do the conga (or whatever dance your particular tastebuds prefer). The way that the Brussels sprouts meld with the garlic and the goat cheese is simply divine. And there are no ifs ands or buts about it.

Today's Cast of Characters:

Absolutely delicious today guys. A net of Brussels sprouts, which I imagine is a pound, some goat cheese, garlic, and olive oil pack the most punch in the dish. These guys are seasoned with salt, pepper, italian seasoning, and a bit of cayenne pepper thrown in for a little kick. Occasionally I get really crazy and throw in some onion but I kept it simple today. If you don't like goat cheese, you could make this with any soft or semi soft cheese. I would recommend brie or gruyère so that you don't overshadow the Brussels sprouts' flavor but you could experiment with Gorgonzola or another intense cheese and see how it turns out. I bet it would be wonderful.

What to Do:

Wash and cut the Brussels sprouts into quarters for easy cooking. I remove the outer layer of leaves but I don't exactly know why so you could do this if you wanted or just leave them the way they are and cut off the bottom a bit. I try to make all of my pieces relatively equal but I have issues with that sometimes. It really doesn't matter because they taste great even if you screw up a little bit. They are a very forgiving (and yet temperamental) vegetable.

Put the olive oil in a pan on medium high heat and wait until the olive oil is fragrant before putting in the garlic. Cook the garlic for about one minute or until the pieces juuuust start to brown.Throw in your quartered sprouts and a pinch of salt and toss a few times until the Brussels sprouts are evenly browned and fork tender.

Hurray! It's time to add the Italian seasoning, and a little pinch of cayenne pepper. I prefer a little kick and this is a great way to get it. Sometimes I substitute a little Cajun seasoning instead of the Italian seasoning/cayenne pepper combo.Both definitely work too!

Finally, turn the heat off and add a few spoon fulls of the goat cheese crumbles. Toss and allow the goat cheese to melt a bit before serving. Plate them up and enjoy!

Sautéed Brussels Sprouts with Goat Cheese

Ingredients:

1 lb Brussel Sprouts
2 or 3 cloves of Garlic, minced
1/2 tsp Salt
1/4 tsp Italian Seasoning
1 pinch Cayenne Pepper (about 1/8 tsp)
About 3 tbsp Olive Oil
Goat Cheese to taste (I used about 2 tbsp)

Directions: 

1. Rinse Brussels sprouts, peel off the outer leaves if desired. Chop the sprouts into quarters and put aside.
2.  In a large sautée pan, heat the olive oil up over medium high heat until fragrant. Add the garlic and cook until garlic is light golden brown.
3.  Put the reserved Brussels sprouts in the pan. Add salt and stir to coat the sprouts evenly in the olive oil. Cook until the Brussels sprouts are fork tender and have some light golden brown coloring.
4. Once the sprouts are golden brown and fork tender, add in your Italian seasoning and cayenne pepper. Stir and cook about a minute more until the sprouts have an even gold on the lighter parts.
5. Now the fun begins! Turn off the heat and add your goat cheese. I stirred in a few spoonfuls of cheese but you could add more or less depending on how cheesy you like your veggies to be.
6. Allow the goat cheese to melt just a bit and then serve. Enjoy!

Monday, August 20, 2012

of Roasted Cauliflower and Goat Cheese Mash

Glaring lack of updates aside (thanks to a busy schedule of vacations, baptisms, and family hilarity), cauliflower may be the weirdest vegetable that is regularly enjoyed by people. From its creamy off white color to its decidedly broccoli/butternut squash flavor its a study in contrasts. Many people claim to hate cauliflower but I think it's really the strangeness as a vegetable that they can't get over. I am someone who has never hated cauliflower...when I was a kid I would watch with anticipation as my mom prepared cauliflower Parmesan using our pressure cooker. It was a treat in those days because I am fairly certain at least one of my sisters or other collection of relatives had decided to not like cauliflower at the time. These days, since I am on my own I am free to indulge in eating more than my fair share of this underrated kitchen staple.

I absolutely adore cauliflower soup. Its creamy, comforting and fabulously homey for times when I need to be cheered a bit or escape some winter weather. My go to cauliflower though is almost always roasted as I am semi obsessed with roasting veggies. A few weeks ago I did a post on Jenny's Roast Potatoes, but that is really the tip of the iceberg. Everything from carrots to Brussels spouts have met their (eventual) doom after being in my oven. However, I have tried this recipe after boiling the cauliflower in chicken broth and the results were equally delicious.

I was recently dining out when I came across a particularly delicious Parmesan cauliflower gratin. I decided that I would probably like it even more if it used roasted cauliflower and used another one of my loves, goat cheese. The results I share with you today are an incredible compliment to any meal. And so without further ado lets get to it.

Today's Cast of Characters:

Incredibly wholesome today guys, we have very easy no preservatives kinds of food. A medium or large head of cauliflower will do you fabulously for the recipe. Additionally, some garlic, olive oil, goat cheese, Parmesan cheese, and a bit of butter round out the dish. You can also add just a bit of milk or cream if you so desire. I don't usually include it because I find the mix creamy enough without it. Don't forget to salt and pepper the cauliflower before roasting. You can also use other spices if you are so inclined. I especially like to stir a pinch or two of fresh chopped basil in, although it sometimes turns them an interesting green color if I add more. Chives would work wonderfully here as well.

What to Do:

Preheat your oven to 400 degrees Fahrenheit. While it is warming up, toss the chopped up cauliflower and minced garlic with a little bit of olive oil. If you would prefer a more roasted garlicesque flavor to your mash leave the cloves whole and toss with oil to coat.

Pour the mix onto a sheet pan and spread evenly on a single layer. We are going for a nice roasted cauliflower and overcrowding the pan will lead to a more steamed cauliflower taste. The flavor of roasted cauliflower is what makes this dish so special so try to get this part right. Sprinkle this mix with salt and pepper to taste. I use a bit less salt because Parmesan cheese is salty. You can also sprinkle on any roasting spice you choose. Sprigs of fresh thyme would be a delicious way to give this a more homey flavor. I would use red pepper flakes or paprika but feel free to experiment.

Place the cauliflower in the preheated oven and bake for about twenty five or thirty minutes. The cauliflower should be lightly browned on top and fork tender when pierced. Once you get to the desired doneness bring it out and let the pan cool for a bit because you don't want to melt bits of your plastic food processor.

In a food processor or blender, put the melted butter, cheeses, and cream if desired. Then spoon your cauliflower garlic mix on top and pulse until well mixed and creamy looking. The mix shouldn't have tons of large lumps but a few are ok I think. While I prefer mashed potatoes smooth with absolutely no lumps, I feel this mix tastes best with just a few.

Now is the choose your own adventure part. You could stir in your optional fresh herbs and serve it up in a big bowl at your table a la a bowl of mashed potatoes and that would be perfectly wonderful and delicious.

OR

You could take this dish one step further and after mixing in your optional fresh herbs or not you could spoon the mix into individual ramekins and pop them back into the oven a la the original cauliflower gratin inspiration. If you choose to do this bake them for about ten to fifteen minutes at 400 degrees. I usually only bake them for around ten sometimes even less. The point is to have the top be a bit bubbly and starting to brown ever so slightly.

Either way you choose to serve these the result will be delectable. So remember to enjoy!


Roasted Cauliflower Goat Cheese Mash

Ingredients:

1 head of Cauliflower
2 tbsp Olive Oil
2 to 3 cloves Garlic
2 tbsp butter, melted
2 tbsp Parmesan Cheese
5 tbsp Goat cheese
Salt and Pepper to Taste
Any other Herb or Roasting Spice you want


Directions:

1. Preheat oven to 400 degrees Fahrenheit
2. Toss the garlic and cauliflower in the olive oil. Sprinkle with salt, pepper, and any other roasting spice you choose. Place in preheated oven and bake for 25 to 30 minutes or until top is lightly browned and cauliflower is fork tender. Cool slightly.
3. In a food processor, put in Parmesan, goat cheese, and butter. Pour in the cauliflower garlic mix and process until smooth and creamy. Stir in fresh herbs if so desired.
4. Remove mix to a large bowl to serve.
OR
5. Transfer the mix to individual ramekins and place back in the oven for 10 minutes. Remove when mix edges are just starting to brown.
6. Either way you choose to serve this dish, enjoy!